理解 HarmonyOS 应用与生成式 AI 能力
理解 HarmonyOS 应用
HarmonyOS 应用的组成:
- 语言。ArkTS 是鸿蒙生态中基于 TypeScript 扩展的应用开发语言。
- UI 框架。ArkUI 是一套构建分布式应用界面的声明式 UI 开发框架。它与我们先前引入的 AutoPage 并没有太多的区别,可以结合思维链进行代码和 UI 生成。
对应的支撑工具包含:
- IDE。DevEco Studio 是 HarmonyOS 应用开发的集成开发环境,提供了代码编辑、编译构建、调试、模拟器等一系列开发工具。
- 构建工具。DevEco Hvigor 是使用 TypeScript 语言开发的全新轻量化的任务调度工具,针对 HarmonyOS 应用提供了一系列编译构建任务,支持将 HarmonyOS 应用编译构建出对应的产物包。
- 模拟器。使用远程模拟器支持JS、ArkTS单语言调试和JS+Java跨语言调试能力;使用本地模拟器支持JS和C++的调试;同时还支持分布式应用/服务的跨设备调试,帮助开发者更方便、高效的调试应用/服务。
- OHPM 包管理器。OHPM CLI(OpenHarmony Package Manager Command-line Interface) 作为鸿蒙生态三方库的包管理工具,支持共享包的发布、安装和依赖管理。
应用组件入口:UIAbility
UIAbility 组件是一种包含 UI 界面的应用组件,主要用于和用户交互。UIAbility 组件是系统调度的基本单元,为应用提供绘制界面的窗口; 一个 UIAbility 组件中可以通过多个页面来实现一个功能模块。每一个 UIAbility 组件实例, 都对应于一个最近任务列表中的任务。
文档:UIAbility 组件
每个 UIAbility 类实例都会与一个 WindowStage 类实例绑定,该类起到了应用进程内窗口管理器的作用。它包含一个主窗口。 也就是说 UIAbility 通过 WindowStage 持有了一个窗口,该窗口为 ArkUI 提供了绘制区域。
import UIAbility from '@ohos.app.ability.UIAbility';
import hilog from '@ohos.hilog';
import window from '@ohos.window';

export default class EntryAbility extends UIAbility {
  onCreate(want, launchParam) {
    hilog.info(0x0000, 'testTag', '%{public}s', 'Ability onCreate');
  }

  onDestroy() {
    hilog.info(0x0000, 'testTag', '%{public}s', 'Ability onDestroy');
  }

  onWindowStageCreate(windowStage: window.WindowStage) {
    // Main window is created, set main page for this ability
    hilog.info(0x0000, 'testTag', '%{public}s', 'Ability onWindowStageCreate');

    // 设置 UI 界面加载
    windowStage.loadContent('pages/Index', (err, data) => {
      if (err.code) {
        hilog.error(0x0000, 'testTag', 'Failed to load the content. Cause: %{public}s', JSON.stringify(err) ?? '');
        return;
      }
      hilog.info(0x0000, 'testTag', 'Succeeded in loading the content. Data: %{public}s', JSON.stringify(data) ?? '');
    });
  }

  onWindowStageDestroy() {
    // Main window is destroyed, release UI related resources
    hilog.info(0x0000, 'testTag', '%{public}s', 'Ability onWindowStageDestroy');
  }

  onForeground() {
    // Ability has brought to foreground
    hilog.info(0x0000, 'testTag', '%{public}s', 'Ability onForeground');
  }

  onBackground() {
    // Ability has back to background
    hilog.info(0x0000, 'testTag', '%{public}s', 'Ability onBackground');
  }
}
HarmonyOS 布局:ArkUI
方舟开发框架(简称 ArkUI)为 HarmonyOS 应用的 UI 开发提供了完整的基础设施,包括简洁的UI语法、丰富的 UI 功能(组件、布局、动画以及交互事件), 以及实时界面预览工具等,可以支持开发者进行可视化界面开发。
@Entry
@Component
struct Index {
  @State counter: number = 0

  build() {
    // 生成一个经典的前端 counter
    Column({}) {
      Text('Blog Title').fontSize(24).fontWeight(FontWeight.Bold)
      Text('Author: John Doe').fontSize(18).fontColor(Color.Blue)
      Text('Published Date: July 1, 2022').fontSize(18).fontColor(Color.Blue)
      Image('blog_image.jpg').width('100%').height(300)
      Text('Blog Content goes here...').fontSize(18)
      Button('Like', { type: ButtonType.Normal, stateEffect: true })
        .borderRadius(8)
        .backgroundColor(0xFF0000)
        .width(100)
        .height(40)
    }.width('100%').margin(20).padding({ left: 20, right: 20 })
  }
}
生成式 AI 能力
生成式 AI 能力是指通过 AI 模型生成代码、文档、测试等能力。在 HarmonyOS 应用开发中,我们可以使用生成式 AI 能力来辅助开发者完成一些重复性的工作, 比如生成测试代码、生成布局代码、生成持续集成脚本等。
- AI 生成持续集成脚本
- AI 生成 HarmonyOS 测试代码
- AI 迁移 Android 布局到鸿蒙应用
- AI 生成鸿蒙应用 ArkUI 布局
- AI 辅助日常鸿蒙代码编写
其它 AI 能力还包括:
- 诸如于 C++ 语言的支持
- 微信小程序等小程序平台的转换
AI 辅助日常鸿蒙代码编写
- 从插件市场安装应用:https://plugins.jetbrains.com/plugin/21520-autodev
- 右键选则对应的
AutoDev AI Action
ArkUI 代码补全
TODO: check this.
官方提供了对应的 AI 代码补全功能,可以帮助开发者快速生成代码。
ArkUI 文档生成
使用 AutoDev 生成对应代码的文档。
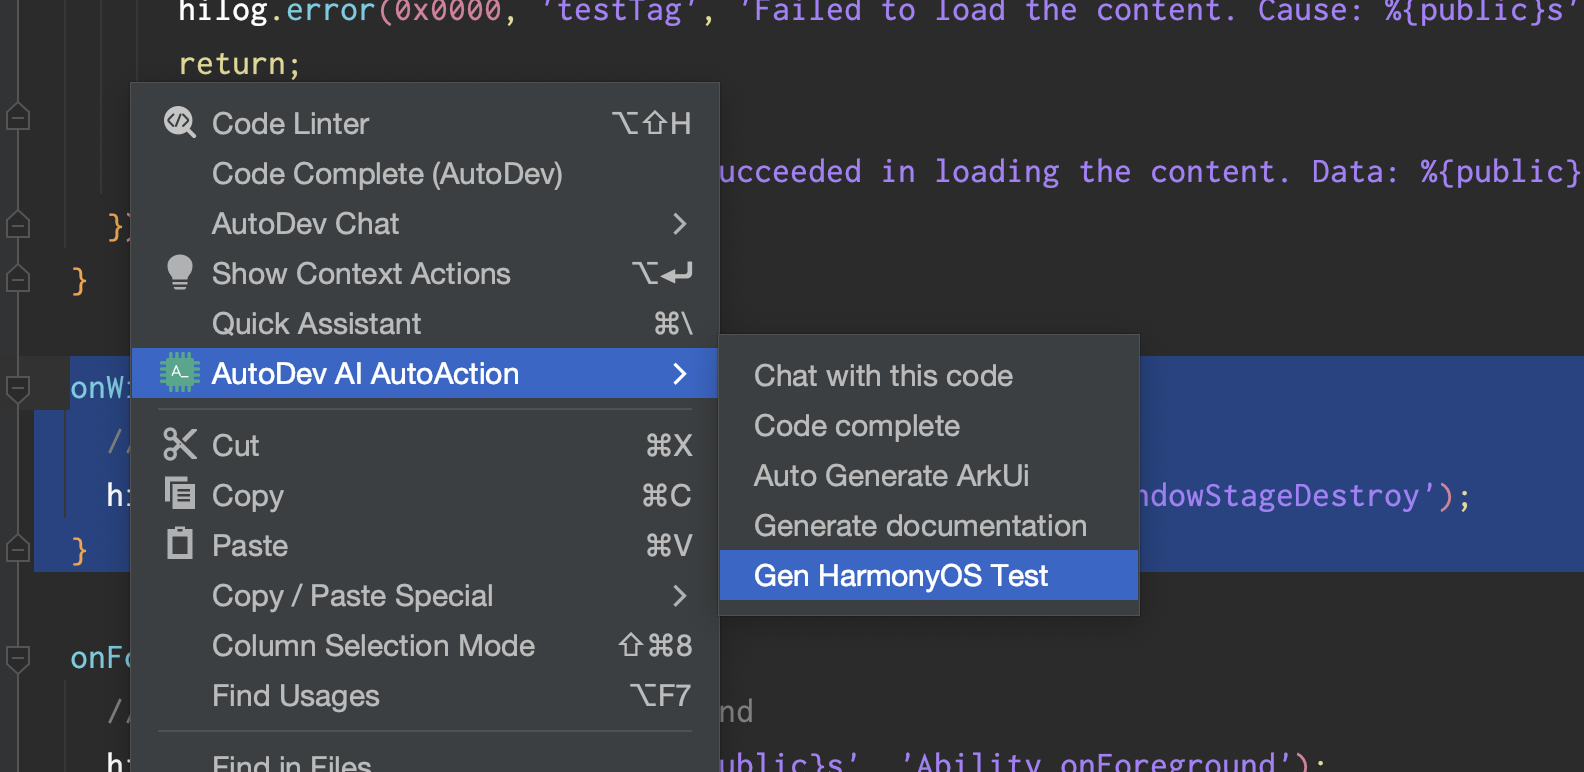
AI 生成 HarmonyOS 测试代码
使用方式
- 从插件市场安装应用:https://plugins.jetbrains.com/plugin/21520-autodev
- 在项目目录创建
prompts/Gen-HarmonyOS-Test.vm文件,写入 prompt - 右键选中内容,执行
AutoDev AI Action,点击Gen HarmonyOS Test即可生成测试代码。
右键示例:
Prompt 示例
---
interaction: ChatPanel
---

Write Test for follow ${language} language code.

1. You should use `describe` `it` `expect` to write test.
2. Here is '@ohos/hypium' test framework support method, you can use it:
```ArkTS
assertClose(expectValue: number, precision: number): void, assertContain(expectValue: any): void, assertEqual(expectValue: any): void,
assertFail(): void, assertFalse(): void, assertTrue(): void, assertInstanceOf(expectValue: string): void, not(): Assert;,
assertDeepEquals(expectValue: any):void, assertPromiseIsPending(): void, assertPromiseIsRejected(): void,
assertPromiseIsRejectedWith(expectValue?: any): void, assertPromiseIsRejectedWithError(...expectValue): void,
assertPromiseIsResolved(): void, assertPromiseIsResolvedWith(expectValue?: any): void
```

For example:

```ArkTS
import { describe, it, expect } from '@ohos/hypium'

export default function abilityTest() {
  describe('ActsAbilityTest', function () {
    it('assertContain',0, function () {
      let a = 'abc'
      let b = 'b'

      expect(a).assertContain(b)
      expect(a).assertEqual(a)
    })
  })
}
```

Here is user code:

```ArkTS
${selection}
```

Please write test for it, use markdown syntax.
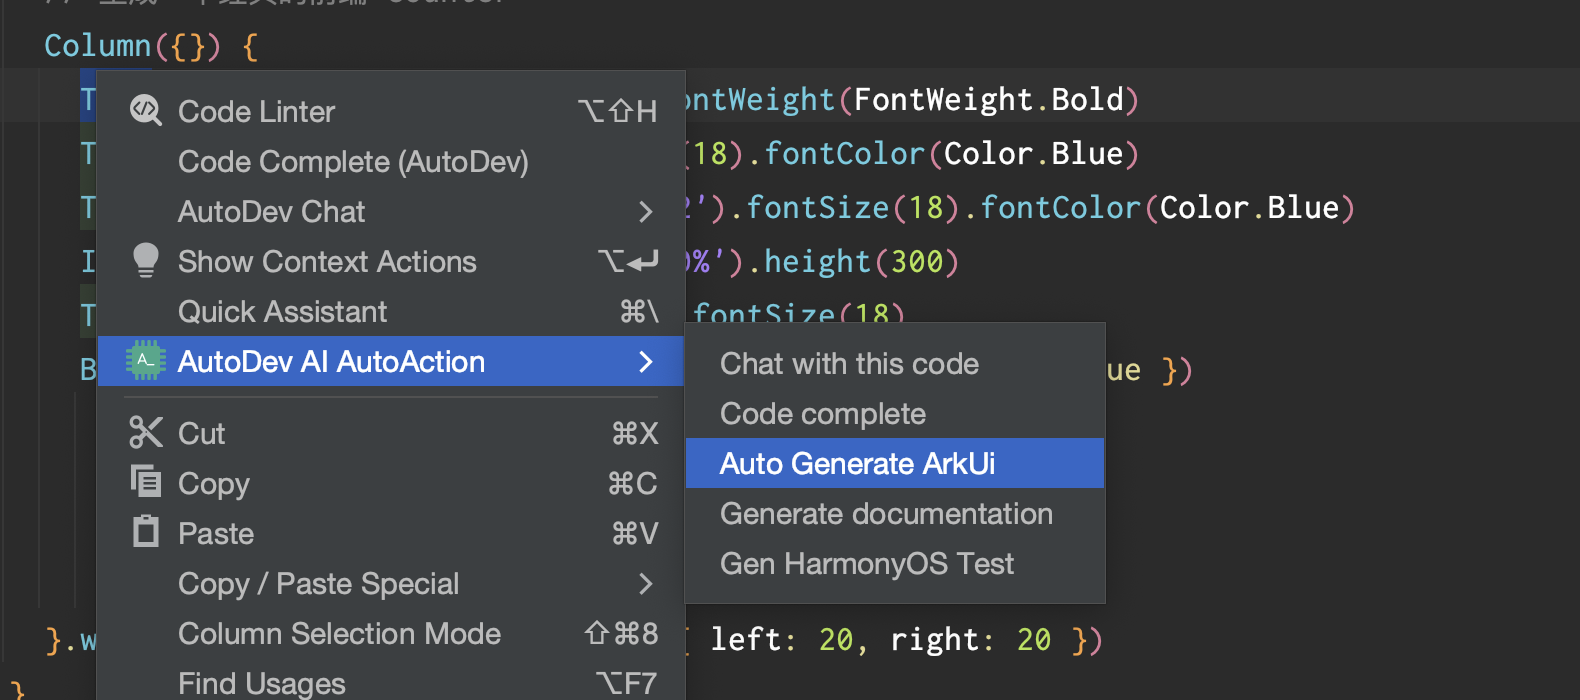
AI 生成鸿蒙应用 ArkUI 布局
使用方式
- 从插件市场安装应用:https://plugins.jetbrains.com/plugin/21520-autodev
- 选中需求,右键选择
AutoDev AI Action,点击Auto Generate ArkUI即可生成代码。
需求示例
Counter
// 生成一个经典的前端 counter
Sample code:
Column({}) {
  Text('Blog Title').fontSize(24).fontWeight(FontWeight.Bold)
  Text('Author: John Doe').fontSize(18).fontColor(Color.Blue)
  Text('Published Date: July 1, 2022').fontSize(18).fontColor(Color.Blue)
  Image('blog_image.jpg').width('100%').height(300)
  Text('Blog Content goes here...').fontSize(18)
  Button('Like', { type: ButtonType.Normal, stateEffect: true })
    .borderRadius(8)
    .backgroundColor(0xFF0000)
    .width(100)
    .height(40)
}.width('100%').margin(20).padding({ left: 20, right: 20 })
聊天列表页
// 生成一个聊天列表页,item 需要包含头像、昵称、最后一条聊天记录,尽可能让页面美观
Sample code:
Row() {
  List({ space: 10 }) {
    ListItem() {
      Row({ space: 20 }) {
        Image(this.avatarUrl)
          .width(40)
          .height(40)
        Column() {
          Text(this.nickname)
            .fontSize(16)
            .fontWeight('bold')
          Text(this.lastMessage)
            .fontSize(12)
            .fontColor('#666666')
        }
      }
    }
  }
  .width('100%')
  .height(200)
  .padding(10)
  .backgroundColor(Color.Pink)
}
Search 组件
// 生成 Search 组件,可以设置placeholder文本样式和颜色、搜索框内文本样式,以及submit和onChange等方法触发时的操作。
Sample code:
Column() {
  TextInput()
    // .placeholder('请输入搜索内容')
    .placeholderFont({ size: 16, weight: 400 })
    .placeholderColor(Color.Grey)
    .fontColor(Color.Black)
    .fontSize(18)
    .width('100%')
    .height(40)
    .margin(10)
    .onChange((value: string) => {
      console.log(value);
      // Perform onChange action
    });
  Button('搜索', { type: ButtonType.Normal })
    .width(80)
    .height(36)
    .onClick(() => {
      // Perform submit action
    })
    .margin(10);
}
音乐专辑主页
// 音乐专辑主页
// 头部返回栏: 因元素单一、位置固定在顶部,因此适合采用自适应拉伸,充分利用顶部区域。
// 专辑封面: 使用栅格组件控制占比,在小尺寸屏幕下封面图与歌单描述在同一行。
// 歌曲列表: 使用栅格组件控制宽度,在小尺寸屏幕下宽度为屏幕的100%,中尺寸屏幕下宽度为屏幕的50%,大尺寸屏幕下宽度为屏幕的75%。
// 播放器: 采用自适应拉伸,充分使用底部区域。
Sample code:
Column({ space: 0 }) {
  // 头部返回栏
  Row() {
    // Icon('arrow_back').onClick(this.goBack)
    Text('专辑主页').flexGrow(1).textAlign(TextAlign.Center)
    // Icon('more_vert').onClick(this.showMenu)
  }.height(50).width('100%').backgroundColor(0x2196F3)

  // 专辑封面
  Row({ space: 10 }) {
    Image('album_cover').width('30%').aspectRatio(1).backgroundColor(0xFFCC00)
    Text('歌单描述').width('70%').backgroundColor(0xF5F5F5)
  }.width('90%')

  // 歌曲列表
  Column({ space: 5 }) {
    Flex({
      direction: FlexDirection.Row,
      wrap: FlexWrap.NoWrap,
      justifyContent: FlexAlign.SpaceBetween,
      alignItems: ItemAlign.Center
    }) {
      Text('歌曲1').width('30%').height(50).backgroundColor(0xD2B48C)
      Text('歌曲2').width('30%').height(50).backgroundColor(0xF5DEB3)
      Text('歌曲3').width('30%').height(50).backgroundColor(0xD2B48C)
    }
    .width('100%')
    .backgroundColor(0xAFEEEE)

    Flex({
      direction: FlexDirection.Row,
      wrap: FlexWrap.NoWrap,
      justifyContent: FlexAlign.SpaceBetween,
      alignItems: ItemAlign.Center
    }) {
      Text('歌曲4').width('30%').height(50).backgroundColor(0xF5DEB3)
      Text('歌曲5').width('30%').height(50).backgroundColor(0xD2B48C)
      Text('歌曲6').width('30%').height(50).backgroundColor(0xF5DEB3)
    }
    .width('100%')
    .backgroundColor(0xAFEEEE)
  }
  .width('75%')

  // 播放器
  Row() {
    // Icon('play_arrow')
    Text('播放器').flexGrow(1).textAlign(TextAlign.Center)
    // Icon('favorite_border')
  }.height(50).width('100%').backgroundColor(0x2196F3)
}
健康饮食详细页
// 生成一个:健康饮食详细页。
// 要求:使用滑动组件展示食物的详细信息,包括使用画布组件展示单位重量的食物各个营养元素的的占比,使用进度条组件展示当前食物是否为高热食物,
// 以及展示单位重量的食物所包含的热量、脂肪、蛋白质、碳水以及维他命C值;并且点击记录按钮可以弹出记录饮食的弹窗,包括记录食物的种类、重量以及用餐时间,
// 可以通过点击完成添加饮食,同时添加的饮食信息会在“记录”Tab页签做展示。
Sample code:
Column({ space: 10 }) {
  Text('食物名称')
    .textAlign(TextAlign.Center)
    .fontSize(20)
    .fontColor('#ff0000')

  Row() {
    Text('食物详情')
      .margin({ right: 10 })
      .width('60%')
      .height(300)
      .backgroundColor(0xF5DEB3)

    Column({ space: 5 }) {
      Flex({
        direction: FlexDirection.Row,
        wrap: FlexWrap.NoWrap,
        justifyContent: FlexAlign.SpaceBetween,
        alignItems: ItemAlign.Center
      }) {
        Text('热量')
          .width('30%')
          .height(50)
          .backgroundColor(0xF5DEB3)
        Text('脂肪')
          .width('30%')
          .height(50)
          .backgroundColor(0xD2B48C)
        Text('蛋白质')
          .width('30%')
          .height(50)
          .backgroundColor(0xF5DEB3)
      }
      .height(70)
      .width('90%')
      .backgroundColor(0xAFEEEE)

      Flex({
        direction: FlexDirection.Row,
        wrap: FlexWrap.NoWrap,
        justifyContent: FlexAlign.SpaceBetween,
        alignItems: ItemAlign.Center
      }) {
        Text('碳水')
          .width('30%')
          .height(50)
          .backgroundColor(0xF5DEB3)
        Text('维他命C')
          .width('30%')
          .height(50)
          .backgroundColor(0xD2B48C)
      }
      .height(70)
      .width('90%')
      .backgroundColor(0xAFEEEE)

      Progress({ value: 0, total: 100, type: ProgressType.Capsule })
        .width(200)
        .height(50)
        .style({ strokeWidth: 50 })
      // .value(this.progressValue)

      Button('记录', { type: ButtonType.Normal, stateEffect: true })
        .borderRadius(8)
        .margin({ left: 12 })
        .backgroundColor(0x317aff)
        .width(90)
        .height(40)
        .onClick(() => {
          // 弹出记录饮食的弹窗
          // this.dialogController.open()
        })
    }
  }

  Text('用餐记录')
    .textAlign(TextAlign.Center)
    .fontSize(16)
    .fontColor('#0000ff')

  Column() {
    // 饮食记录展示
    // CustomDialogControllerExample({})
  }
}
.width('90%')
AI 迁移 Android 布局到鸿蒙应用
使用方式
- 从插件市场安装应用:https://plugins.jetbrains.com/plugin/21520-autodev
- 选中需求,右键选择
AutoDev AI Action,点击Auto Generate ArkUI即可生成代码。
布局移动示例
在 Android Studio 或者 DevEco Studio 中,选中对应的布局文件,右键选择 AutoDev AI Action,点击 Auto Generate ArkUI 即可生成代码。
<?xml version="1.0" encoding="utf-8"?>
<LinearLayout xmlns:android="http://schemas.android.com/apk/res/android"
              android:layout_width="match_parent"
              android:layout_height="match_parent"
              android:orientation="vertical" >
    <TextView android:id="@+id/text"
              android:layout_width="wrap_content"
              android:layout_height="wrap_content"
              android:text="Hello, I am a TextView" />
    <Button android:id="@+id/button"
            android:layout_width="wrap_content"
            android:layout_height="wrap_content"
            android:text="Hello, I am a Button" />
</LinearLayout>
AI 生成持续集成脚本
TODO:当前 HarmonyOS 项目要支持这种方式比较有难度,需要等待 HarmonyOS 官方提供支持。
Install
根据 OpenHarmonyOS 的文档: https://ohpm.openharmony.cn/#/cn/help/quickstart ,需要先安装 ohpm 工具包。
下载 CLI 工具:https://developer.harmonyos.com/cn/develop/deveco-studio#download_cli
测试:
➜  MyApplication2 git:(master) ✗ ./node_modules/.bin/hvigor --mode module -p product=default assembleHap
> hvigor Starting Hvigor Daemon...
> hvigor WARN: Failed to start hvigor daemon. The build will be started in no-daemon mode.
> hvigor UP-TO-DATE :entry:default@PreBuild...
> hvigor Finished :entry:default@GenerateMetadata... after 7 ms
> hvigor Finished :entry:default@MergeProfile... after 2 ms
> hvigor Finished :entry:default@BuildNativeWithCmake... after 1 ms
> hvigor Finished :entry:default@GenerateLoaderJson... after 4 ms
> hvigor Finished :entry:default@MakePackInfo... after 6 ms
> hvigor Finished :entry:default@ProcessProfile... after 88 ms
> hvigor Finished :entry:default@BuildNativeWithNinja... after 1 ms
> hvigor Finished :entry:default@ProcessResource... after 3 ms
> hvigor UP-TO-DATE :entry:default@ProcessLibs...
> hvigor Finished :entry:default@CompileResource... after 49 ms
> hvigor Finished :entry:default@CompileJS... after 3 ms
> hvigor Finished :entry:default@CompileArkTS... after 2 s 376 ms
> hvigor Finished :entry:default@PackageHap... after 1 s 722 ms
> hvigor WARN: Will skip sign 'hos_hap'. No signingConfigs profile is configured in current project.
               If needed, configure the signingConfigs in /Users/phodal/DevEcoStudioProjects/MyApplication2/build-profile.json5 .
> hvigor Finished :entry:default@SignHap... after 2 ms
> hvigor Finished :entry:assembleHap... after 1 ms
> hvigor BUILD SUCCESSFUL in 5 s 130 ms
安装 SDK
command-line-tools/sdkmanager/bin/sdkmgr install toolchains:9 OpenHarmony/toolchains:9 --accept-license
Linux 下跑不成功??
Run # chmod +x commandline-tools-linux-
  # chmod +x commandline-tools-linux-
  chmod +x command-line-tools/sdkmanager/bin/sdkmgr
  # 安装 HarmonyOS SDK
  command-line-tools/sdkmanager/bin/sdkmgr install toolchains:9 OpenHarmony/toolchains:9 --accept-license
  shell: /usr/bin/bash -e {0}
  env:
    JAVA_HOME: /opt/hostedtoolcache/Java_Zulu_jdk/17.0.10-7/x64
    JAVA_HOME_17_X64: /opt/hostedtoolcache/Java_Zulu_jdk/17.0.10-7/x64

[                    ]0%
[                    ]0%

Failed to request url https://devecostudio-dra.op.hicloud.com/sdkmanager/v5/hos/getSdkList
[                    ]0%

Unable to find the specified toolchains:9.
Error: Process completed with exit code 1.